
Introduction
OranumCam standalone version is available on MacOS as well. The minimum required MAC OSX version is 10.15 Catalina or above.
To check your OS version:
- Click the Apple menu icon at the top left corner of your screen.
- Select the 'About This Mac' command.
- The name and version number of your Mac's operating system appears on the “Overview” tab in the About This Mac window.
Choose 'Software Update', the system will seek for updates.
It is recommended to use the newest OS version. Other updates might be available for the current OS as well, please install if there is any available.
If you tick the box next to 'Automatically keep my Mac up to date' the system will be refreshed automatically.
In case you need to upgrade your OS you can also do it at the following page: https://support.apple.com/macos/upgrade
Installing OranumCam on Mac
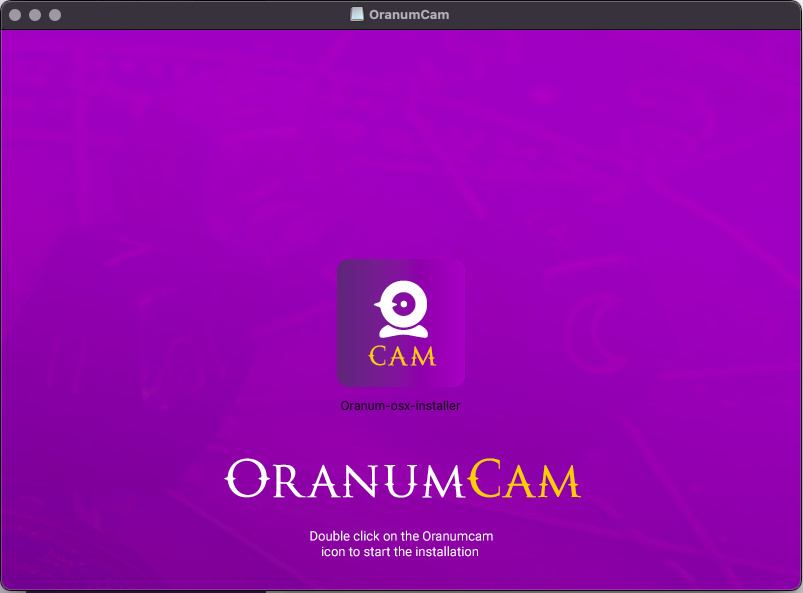
Click on the yellow ‘Download OranumCam’ button in the ‘Home’ menu of your account to download the installation file. Once the download finished, double click on the downloaded OranumCam.dmg file. A window will open, where you will need to click on the OranumCam OS X Installer icon to begin the installation.
This will start the application installation where you will need to follow through the steps described there. Once this is done, you may find OranumCam installed in your applications folder.
If you run into any issues and errors during installation please be sure to check the Installation Issues section of this page.
Installation Issues
Be sure you are logged in with an admin user. To view your rights on Mac OS X follow these steps:
- From the Apple Menu, select System Preferences.
- In the System Preferences window, select Users & Groups (Accounts).
- Select your user account and then view the right panel. If 'Allow user to administer this computer' is not checked then you don't have admin rights.
If you get an error message that says the program cannot be opened because it wasn't downloaded from the Mac App Store, you need to do the following:
- Open System Preferences > Security & Privacy > General tab
NOTE: If prompted, click on the Lock icon on the left corner of the window and enter your Administrator Username and Password. - Set Allow apps downloaded from to Anywhere.
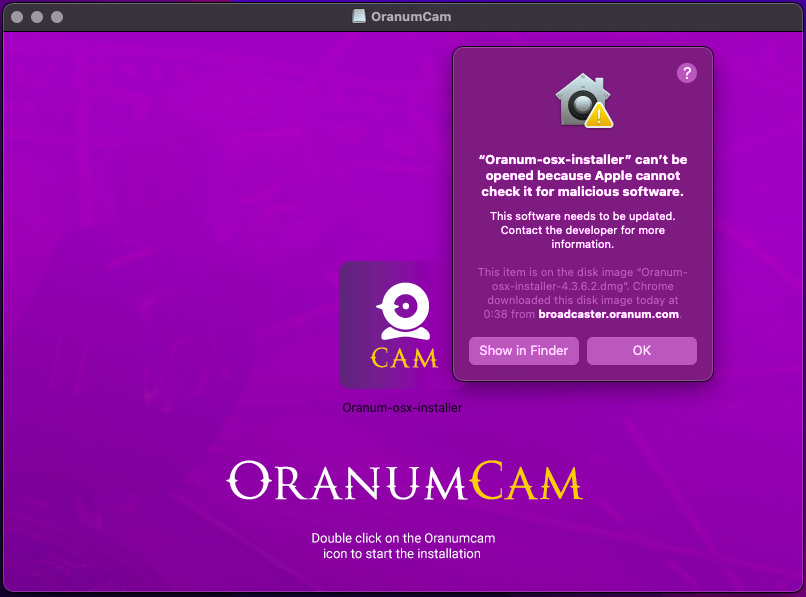
If the computer is running on Catalina or above and the 'Anywhere' is not visible. You can enable it following these steps:
- Be sure to exit System Preferences on your Mac.
- Search and open in Spotlight: Terminal
- Type of the following command syntax: sudo spctl --master-disable. Hit Return
- Authenticate with an admin password. Hit Return.
- Exit Terminal.
- Click on System Preferences on your Mac Dock.
- Choose Security & Privacy.
- Tap the lock at the bottom left of the screen.
- Enter your password to unlock Security and Privacy.
- Choose the Anywhere option under 'Allow apps downloaded from'. Prior to making the change, this option wasn't available.
- Click the unlocked lock to keep the change.
Installation/update is stuck at 0%
- Open Activity Monitor, force quit OranumCam
- Log out of iCloud
- If installed, uninstall OranumCam the following way:
- Open Utilities > Terminal
- Type in "rm " then drag all installed OranumCam files to the Terminal after the typed in characters
- Download and install latest OranumCam
Setting up the camera and Microphone
1.) Verify that the device is plugged into your computer.
NOTE: Some cameras may not be supported by certain operating systems. Based on our experiences, Logitech cameras work well on Mac with our OranumCam software.
Please check our recommended cameras for more information on system requirements.
2.) Make sure you allow access to the camera and microphone for OranumCam in the pop-up when you are starting the application.
If the pop-up is not appearing, you can do it manually this way:
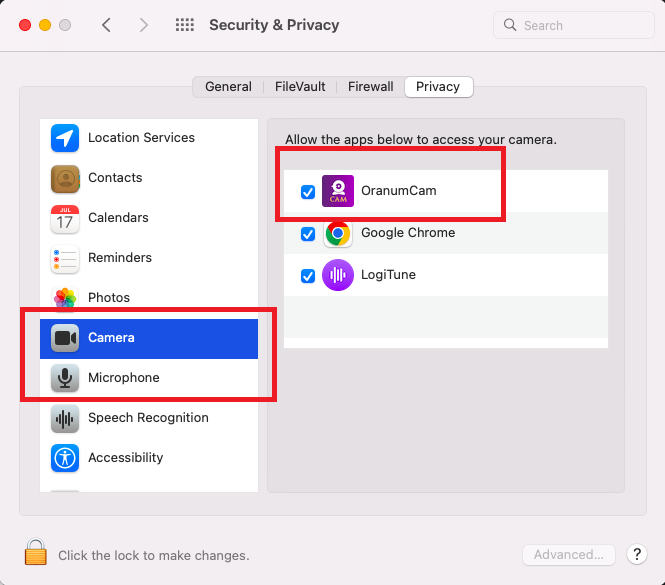
- Open System Preferences -> Security & Privacy -> Privacy.
- Select Camera - tick the checkbox next to OranumCam to allow it to access for camera
- Select Microphone - tick the checkbox next to OranumCam to allow it to access for microphone
If you turn off access for an app, it will be asked to turn it on again the next time that app tries to use the camera or microphone.
3.) It is also recommended to have the latest camera driver installed for your camera. They are included with the camera or may be downloaded from Mac App store.
However, most cameras can be used without drivers as well.
4.) Before logging in, make sure to select your camera source as a Cam Device and Audio Device on the OranumCam login screen and set the resolution format under the Video Quality option to the highest possible 16:9 resolution, such as 864*480.

Camera Setup
All of our recommended webcameras should work without the necessity of installing drivers. Handycams are not compatible with MAC OS X.
Logitech Camera Settings
Basically, Logitech cameras work without driver on MAC.
Under "Webcam Control" tab you can reach the following settings:
- Zoom: Should be on 1.00x value at all times. Please keep in mind that zoom usage may cause a grainy image.
- Pan: This feature is available for specific cameras (i.e. Logitech BCC950). The camera can be turned around with the arrows in 4 directions, and set back with the home position button in the center.
- Focus: All Logitech webcams should have Auto focus off. It can be very detrimental to the image quality when the camera slips in and out of focus upon every movement in the room. Keep the slidebar on the left to provide sharp image.
The "Advanced Settings" allows you to make the following changes in your settings:
- Brightness: Increases the strength of the brighter colors in the image. Default value is advised. Make sure not to overuse, it can cause foggy image. Please also check that you have enough artificial light in the room.
- Contrast: Affects the comparative strength of the dark and light colors in the image. Default value is advised. If the image is foggy, it can be increased slightly. Keep in mind that overusing contrast and unrealistic level of color intensity provides for an unnatural, cartoony look.
- Color intensity: Default value is advised. If set too high, it can make the image rather pixelated and blurred upon movement.
- White balance: Can make the colors have a warmer (orange) or colder (blue) feel to them. With the ideal lighting conditions, this value should stay on default. The Auto option should be off at all times. Incorrect setting of white balance may either cause feed discoloration from extreme blue to extreme yellow.
If logged in with Oranumcam, the Alt+Shift+K key combination will open up a much more detailed settings panel. This is a free built-in feature.
Webcam Settings Application
Alternatively, you can download the "WEBCAM SETTINGS" Application from the MAC App Store.
This application costs $7.99 and gives you more options to adjust your camera.
After starting from Dock/Launchpad, the application's icon is visible in the upper Menu bar where you can:
- Select your Webcam source
- Load previously saved Profiles (if you have any)
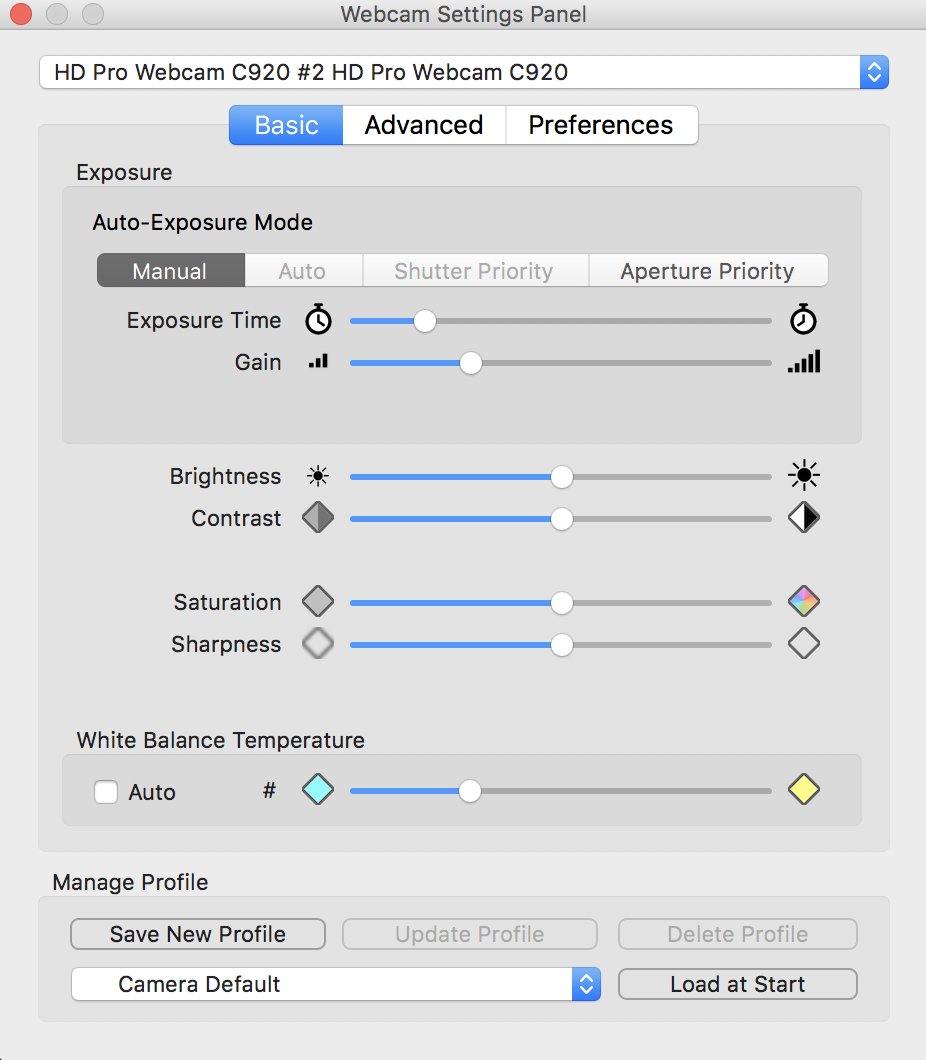
- Open settings to adjust with the "Show Webcam Settings Panel
1. Select camera source from the dropdown menu
2. Basic:
- Set Exposure to manual
- Adjust Exposure Time/Gain. Make sure not to overraise Exposure as it can freeze the image. Add more gain instead.
- Brightness, Contrast, Saturation, Sharpness: can be left on default.
- White balance: untick auto and set it with the slidebar
- On the bottom, you can "Save a New Profile", and later use the "Load at Start" button, this way you can store your ideal settings.
3. Advanced:
- Anti-Flicker: 50 Hz
- Backlight Compensation: should be Off
- Focus: untick auto
- Zoom: none
- Pan & Tilt works for certain cameras which have this option
- LED: It should be OFF.

If you are unsure how to set your camera properly, we advise to ask our assistance and visit us on the Online Support Chat, where we are more than happy to help you out.
Camera Problems
External camera not available to select in OranumCam
Install the LogiTune software
No Image
Please note that the minimum required MAC OSX version is 10.15. With older versions the camera image might not appear at all.
Slow Camera Image
Slow camera image is mostly the result of connection problems or low upload speed. See more in the Connection speed chapter below.
Your camera quality may also decrease with high/overloaded processor or memory use. You may see more about CPU and memory usage at Finder > Applications > Utilities > Activity Monitor. Or by searching for Activity Monitor in Spotlight. In the Activity Monitor click on the CPU and System Memory tabs where you can see the actual use of your CPU and memory. If they are above 80% it can also result in camera problems too. To fix this, please close every unnecessary application to reduce the load on your system. If that does not help, you need to upgrade your computer.
If your camera image appears pixelated while you are online, it might be because the camera is used on other pages as well. Make sure you close all other pages and applications (such as Skype or other similar apps) that could be using your camera.
Perhaps wifi is being used for connection. Switch to ethernet cable
Microphone settings
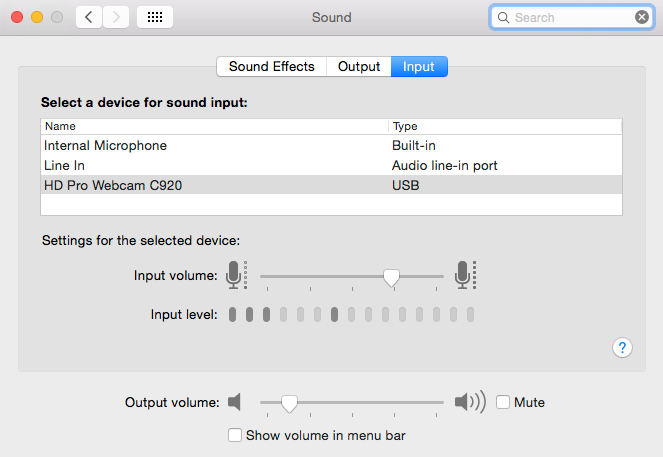
If you have no audio signal after logging in, you may check your active microphones in System Preferences > Sound > Input. Or search for 'Sound' in Spotlight.
You can also set the volume level here with the Input volume slidebar.
Splitters and Other Video Software
On MAC OS X, we do not provide support for any sort of splitter software nor other image enhancing applications. Moreover there is no need of a splitter using MAC OS X, however the quality will be much worse if you are streaming on multiple sites.
Connection Speed
- The minimum required connection is 1500 kbps (1.5 Mbps) international uploading and 2000 kbps (2.0 Mbps) international downloading speed. The recommended one is a broadband connection with 4500 kbps (4.5 Mbps) international uploading and 5000 kbps (5.0 Mbps) downloading speed.
- In case you experience problems with connection speed, such as camera images take too long to load, or they are not continuous, it is recommended that you check your Internet connection speed. You may check your connection speed towards our servers here.
- If the measured bandwidth is too low or lower than what is should be based on the contract/plan with your ISP (Internet Service Provider), first it is recommended that you check all running applications on your computer, see if any of them is using the connection (e.g.: torrent clients, instant messenger programs, etc.).
- It is also worth checking the websites you have open in other browser windows/tabs, since audio/video streaming (e.g.: YouTube) may use up some part of your bandwidth. Turning these programs and websites off may have a positive effect on your browsing experience.
Firewall and Antivirus Application(s)
Firewall and antivirus applications at times significantly slow down or even block your stream. We recommend disabling these applications while you’re working as a performer online.
The Mac operating system has a built-in firewall that provides security by limiting or preventing access to your Mac from the Internet. It is enabled by default.
To disable the firewall, follow the steps below:
Open Finder > Applications > System Preferences > Security & Privacy
- alternative: click on the Apple icon on the top-right corner and select System Preferences, then Security & Privacy
- alternative: Or search for 'Firewall' in Spotlight.
- When the System Preferences screen appears, click Security & Privacy.
- Under Security & Privacy, select Firewall then click Turn Off Firewall or Stop (the layout and labeling varies on different MAC OS versions)
NOTE: There are some cases wherein the Security & Privacy is locked. Unlock it by clicking the Lock icon. Enter your Mac’s Administrator Username and Password when the prompt appears, then click Unlock.
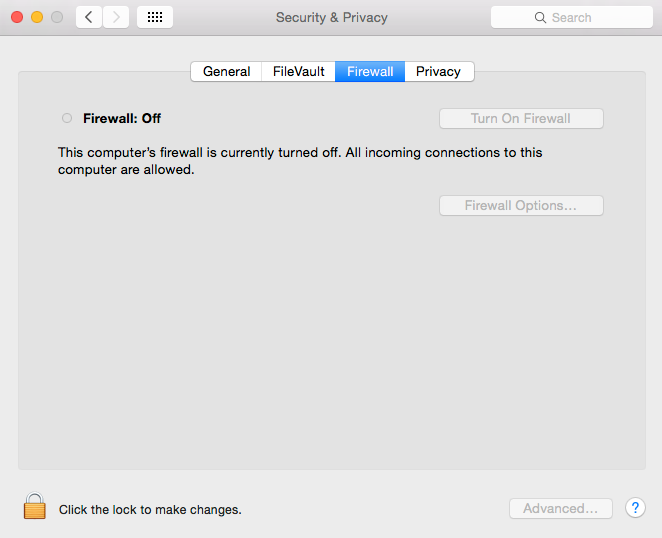
Your Mac’s built-in firewall should be disabled now.
If you’re using a third party firewall, contact the developer of the firewall and ask for assistance on how to disable it.
Running Remote Support file
When visiting the Online Support, our Admins might have to connect to your computer to help you resolve an issue. In such cases, they will send you a link from where you can download and run an OranumCam Remote Support file.
To open TeamViewer, please do the following things:
- Download from the link we send you on the Support Chat
- Open Downloads folder on the Dock bar or via Spotlight
- Double click on 'TeamViewerQS.zip' and wait until the 'TeamViewerQS' application appears in folder
- Double click on 'TeamViewerQS' and click on 'Open' if the security prompt window comes up
To be able to run this file however, you might need to make some changes to your Security & Privacy settings. To do this:
Step 1: Open Finder > Applications > System Preferences > Security & Privacy > General tab or search for Security & Privacy in Spotlight.
NOTE: If prompted, click on the Lock icon on the left corner of the window and enter your Administrator Username and Password.
Step 2: Set Allow apps downloaded from to Anywhere.
Alternatively if you are logged in as an Administrator, you can allow opening the remote support application separately when clicking on it.
Once the file is open, you will have to provide the ID and Password shown on the small window to the Admin on the Online Support Chat and leave the small window open for the Admin to connect to your computer.
Browser issues
Cookies
Our site (as most websites on the Internet) uses the browsers to store certain files in the cache folder, and utilizes cookies and JavaScript. These features should be turned on in your browser.
These settings are on by default, but in case you have any problem, please check the below methods or contact us for help!
To enable JavaScript in Safari, for example, please choose the Safari menu, then click on Preferences. On the Security tab choose 'Enable Javascript'.
To allow cookies in Safari, please choose the Safari menu, then click on Preferences. In the Privacy dialogue box, untick the 'Block Cookies' option'.
In Chrome you may do the same under the Chrome menu > Preferences > Privacy and security
Clearing Cache and Cookie Files
If you experience problems with logging in (e.g.: after entering your password you get back again to the log in page or cannot navigate between pages on the Site/in your Broadcaster Center), it is recommended to delete the files in the cache folder and the cookies from your browser.
In Safari, this can be done if you open the Safari menu, then 'Clear History'. Please select 'All history' in the dropdown menu.

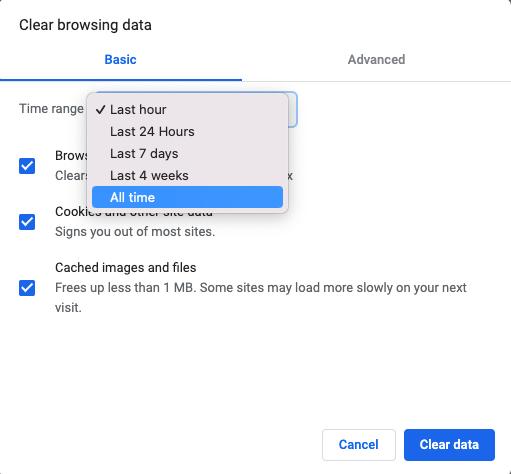
In Google Chrome you may open the Chrome menu and click on 'Clear browsing data'. Please verify the time interval to 'All time' in this case as well.
Uninstall OranumCam Software on Mac
Open a Finder window and click on 'Applications' in the sidebar. Drag-and-drop the application’s icon to the trash can icon. Alternatively, you can do the same on the Launchpad interface and drag-and-drop the application’s icon to the trash can from there.